Creating Templates
Creating Your Interactive RCS Message Templates
Ready to build engaging messages? Here’s how to create your own RCS templates:
Please be aware: that some features may not be available with your operators for some territories
Getting Started
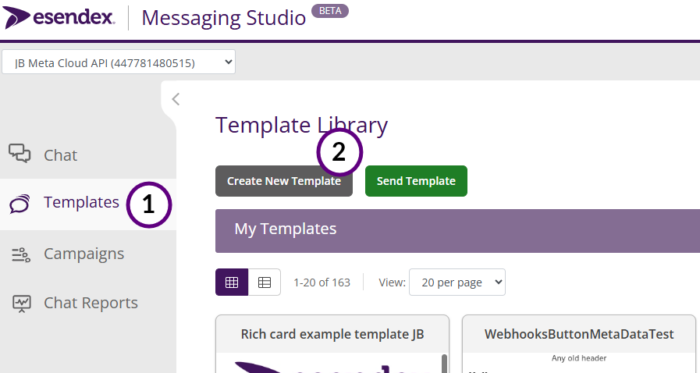
- On the Studio homepage, select templates in the left column; this will take you to the template library.
- Press the “Create New Template” to start the creation process.
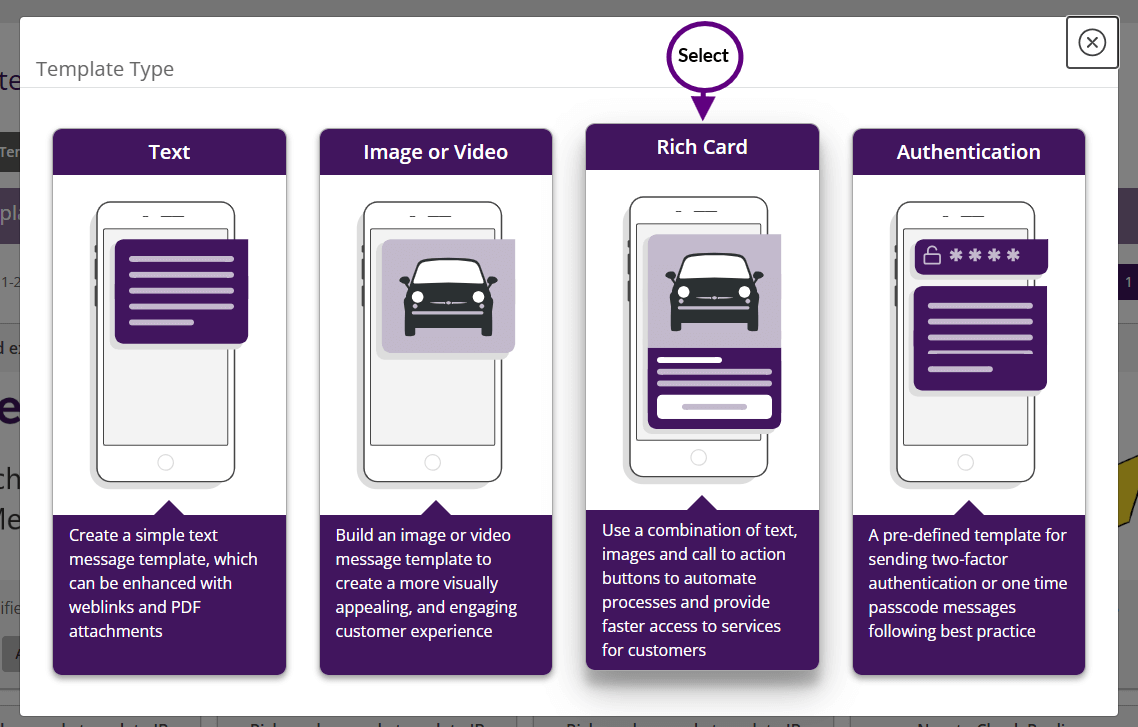
Choosing Your Template Type: Simple RCS (Rich Card)
- For the kind of rich, interactive messages we’re talking about (with images, buttons, and more), you’ll want to choose “Rich Card.” This is what we call “Simple RCS” templates.
Designing Your Rich Card Template: The Basics
- Important Note: Our platform handles several messaging types (like SMS, RCS, and WhatsApp), so not every feature you see will work for RCS. We’ll focus on what you can use.
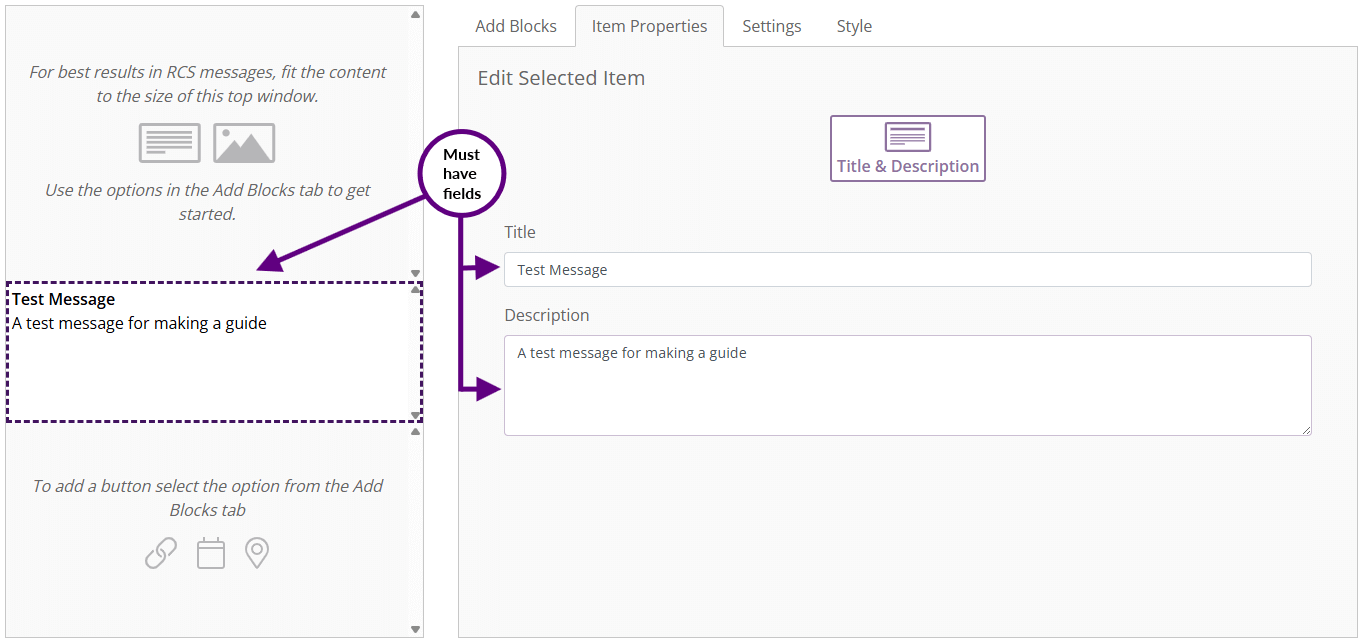
- Must-Have Fields:
- Title or Description: You must include a title or description. This acts as the heading of your message.
Personalisation
You can add personalised information like names, dates, or favourite items using “variable fields.” Just put the variable inside double square brackets, like this: [[name]].
Template editor overview
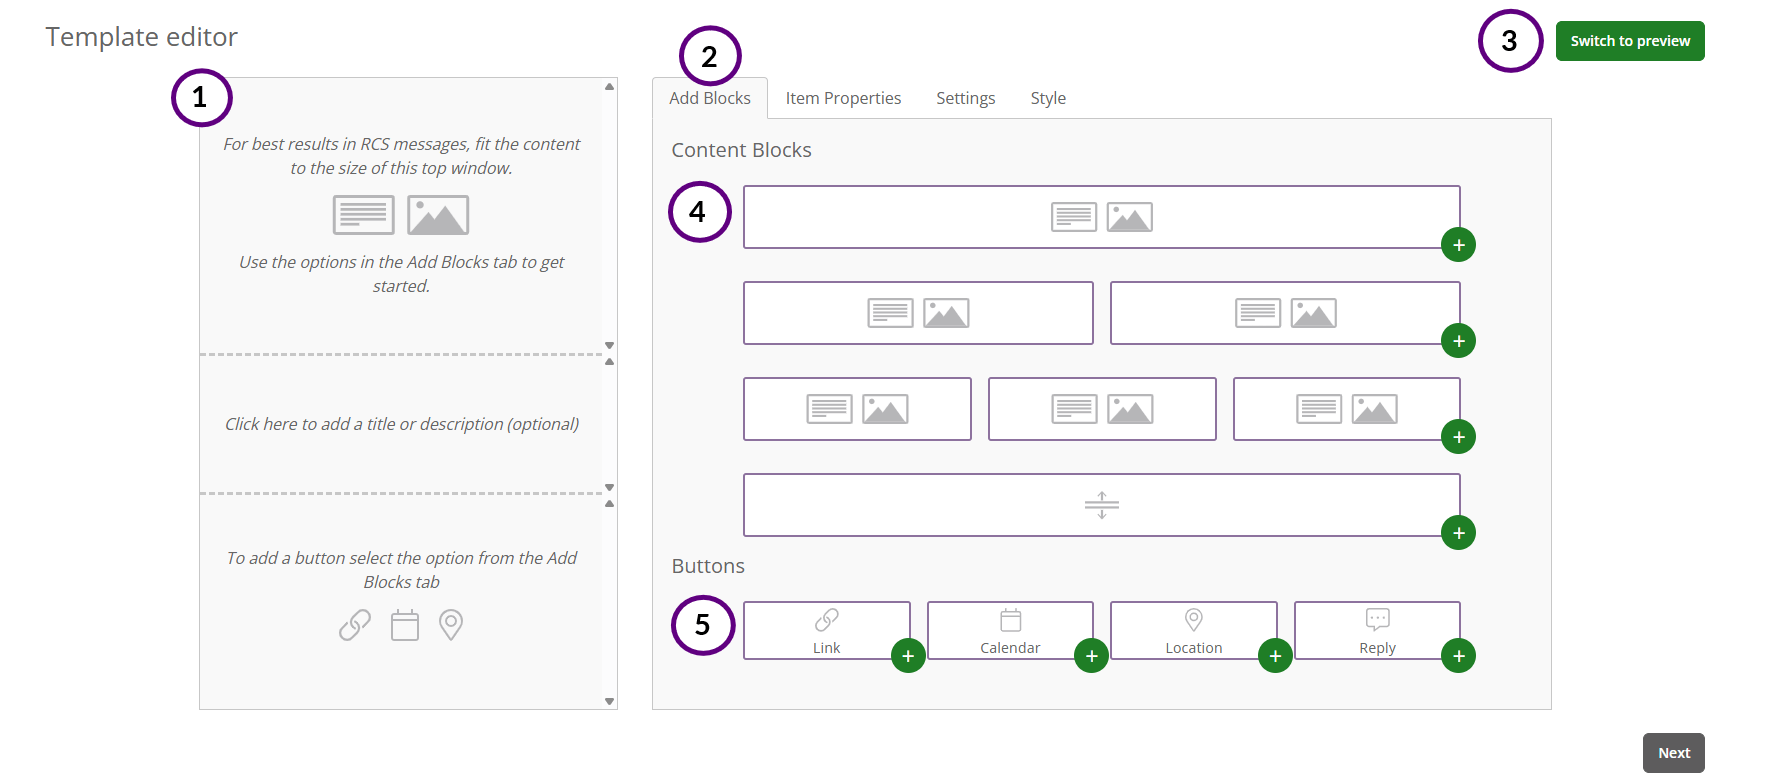
- Layout: This is where any blocks you have selected are added for you to use, you will be able to move these around or delete them.
- Tab segments: These are the sections that you will be using to build your RCS message
-
- Add blocks are what you will use to build the RCS message
- Item properties is where you will be able to edit one of your selected blocks on your layout (add text, image, etc)
- Rich content settings will be here. This will let you add a page title and set up a web preview (image and title for URL linked to landing page).
- Style will let you set colour backgrounds for your RCS content.
-
- Switch to Preview: When building your RCS message, you will have the option to preview how it will look on mobile (you can learn more about this here(add link).
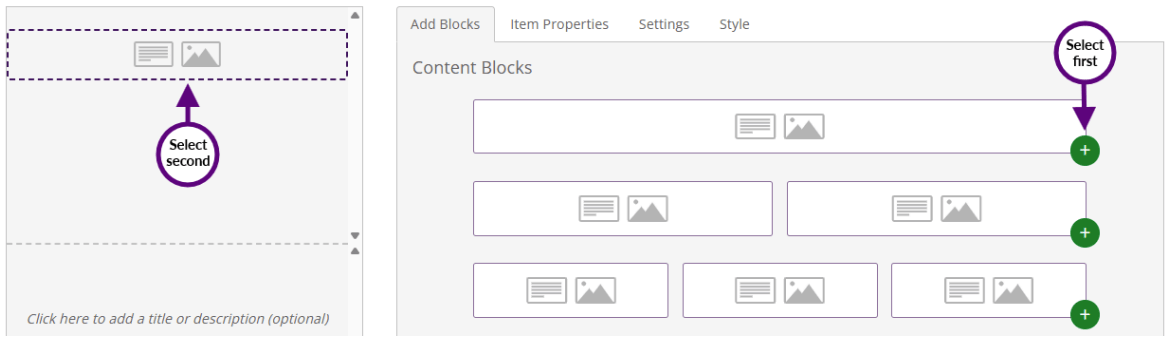
- Content Blocks: These are the layout designs you can use to create your rich messaging, select the plus button to add, you will also have the option of a spacer if needed.
- Buttons: You have the option to add a link button currently (we will look to add calendar, location, reply in future updates).
Adding Text and images
Selecting a Content Block
We have had a quick overview of the layout of the template page, now let’s look at how to create a template, first and text and images.
Select one of the plus signs on the content blocks; this will add it to your message template. Once it’s added, select the block in the template to open.
Text Block overview
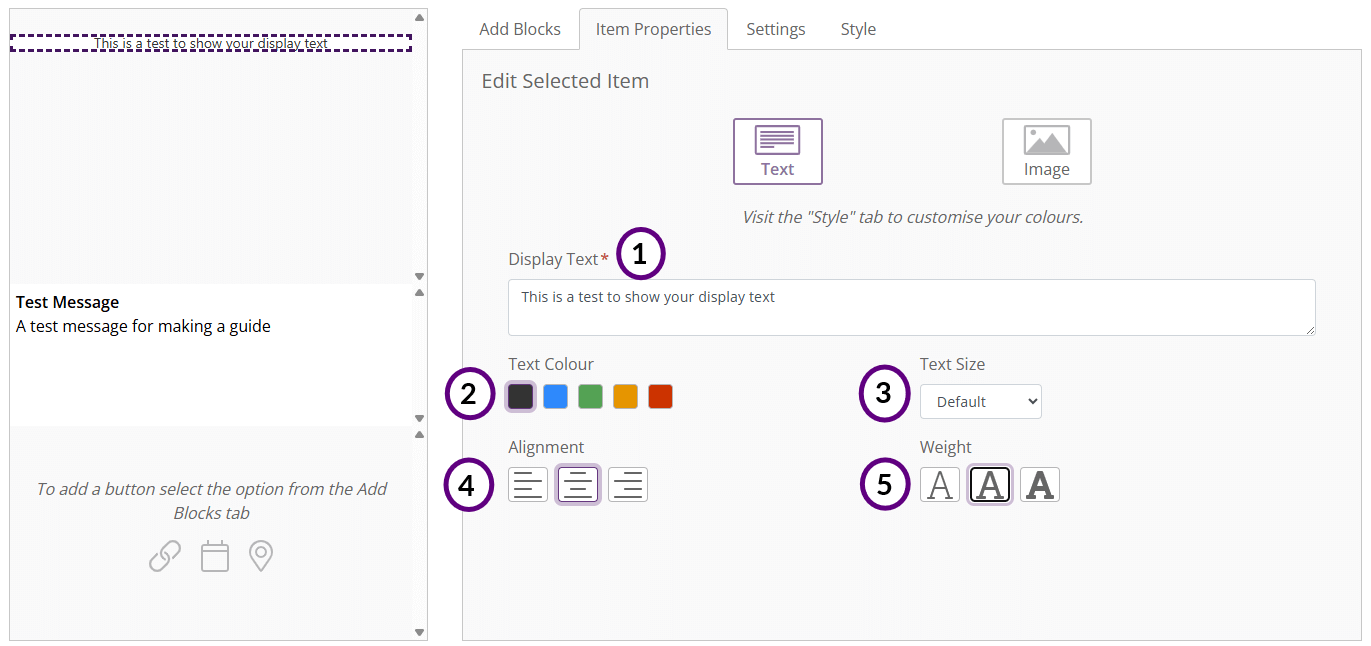
- Display Text: Enter the text that will appear in the Rich message. (This is mandatory if you want to add text.)
- Variable fields can be used in the display text area if required.
- Text Colour: Amend the colour of your text (you can only have one colour per section).
- Text Size: Adjust the size of the text.
- Alignment: Adjust text alignment (left, centre, right)
- Weight: Adjust the weight of the text (Thin, regular, Thick)
When you are happy with your text, click next, which will take you to the final preview, then press next to continue.
Please be aware:
- If you have created your text but want to add an image, do not select the image here; this will take you to the image section and delete your text. Select add blocks and add a new block (or select the two/three-block templates for your design).
- All text colours and sizes will only show in the SMS fallback on the landing page and not on the RCS message.
Image Block overview
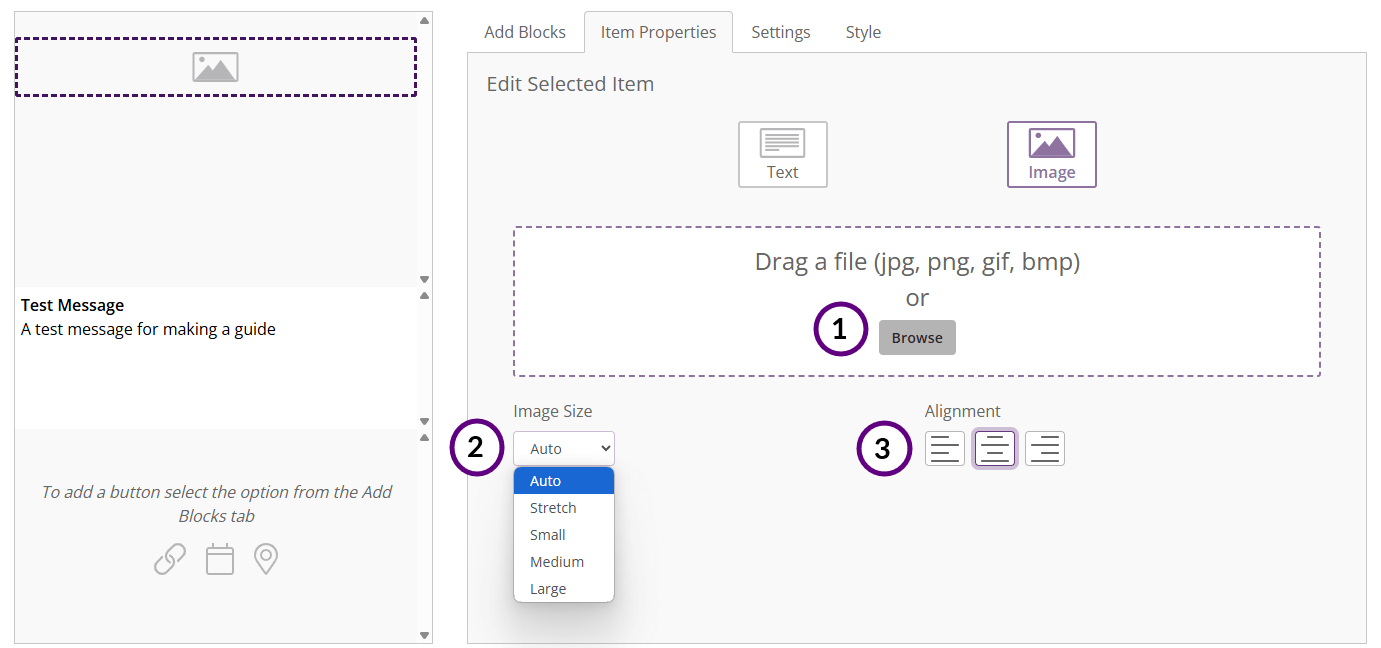
You can include images in your RCS messages as well.
To add an image, press the plus button on one of the blocks, or if you have already created a block, select the add blocks tab and then select.
-
- Adding Image: You can drag and drop your images here, or select the browse button to search for the image in your files.
- Image size: Use the “Image size” drop-down menu to choose how your image will appear.
- Alignment: Adjust Image alignment (left, centre, right)
You can check the image by selecting the preview button. When you have completed your image, select Next for a final preview and then Next again if you want to continue to the next stage.
Adding Buttons
You will have the option to add a Link button to the RCS message; the location, calendar and reply button will be supported at a later date.
Adding a button is the same process as adding a block. Press the plus button and then select the item in the layout for it to take you to the item properties.
Please be aware:
- There is a limit to how many buttons you can have; you can use a maximum of two different link buttons per template. (For example, you can’t have two “call” buttons).
- All text colours and sizes will only show in the SMS fallback on the landing page and not on the RCS message.
Link
Link Buttons will let you add buttons that link to websites, phone calls, or PDFs. Let’s take a look at what you can do.
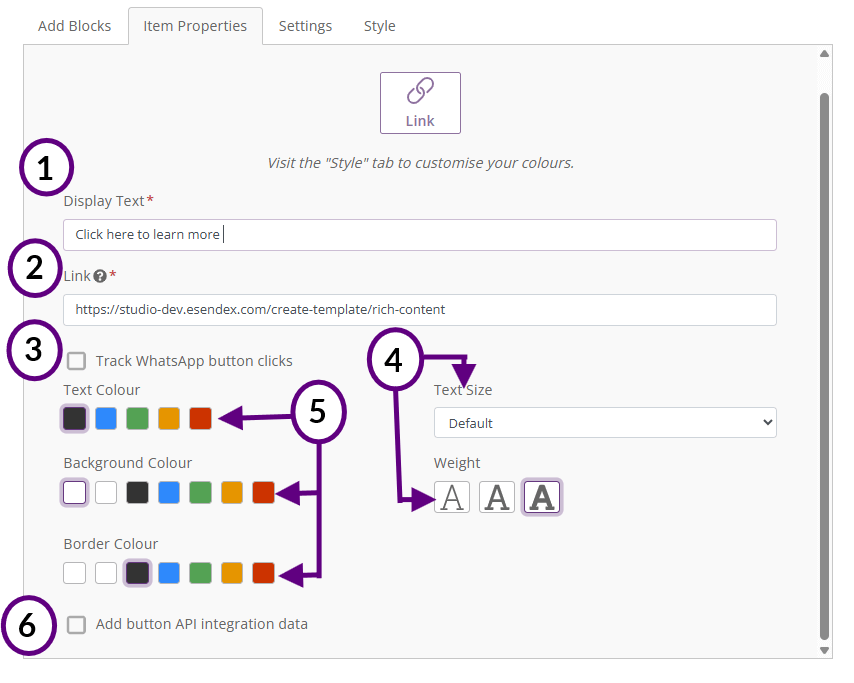
- Display text: This is the text that will appear on your button
- Link: The link that will take the user to the destination after pressing the button.
- web , phone and email are supported for this.
- Track WhatsApp button: Select to track WhatsApp clicks, the link button will be available in your campaign report.
- Text size and weight: Select the size and thickness of your Display text.
- Colour: change the text, background and border of your button.
- API integration data: Adds a button that would record the metadata info for reporting?
Calendar
The calendar button will let you add a calendar button to your RCS message, this will give you the option to add the event dates to your calendar.
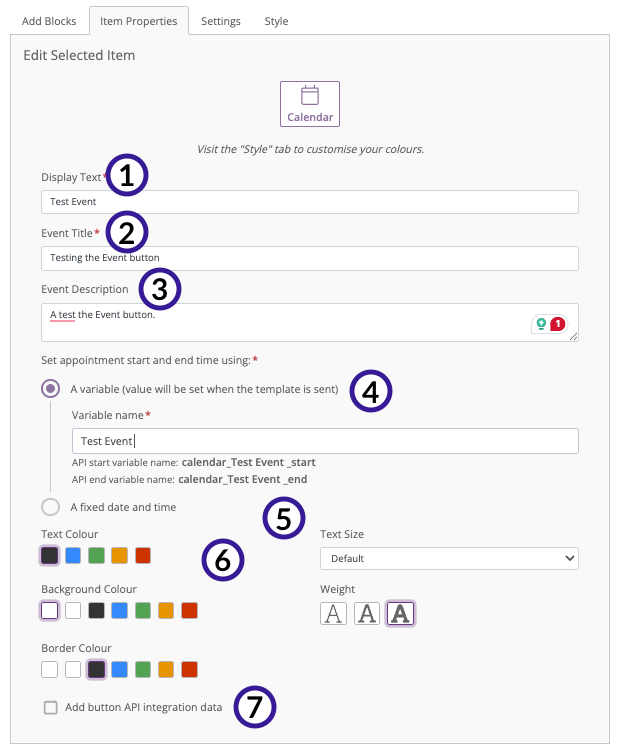
- Display text: This is the text that will appear on your button
- Event title: The name that will appear in the calendar entry in your diary
- Event Description: The description that will appear for the event when added to your diary.
- Set Appointment: Select how you want your recipient to receive the event date when pressing the button; there are two options, Variable and Fixed date.
- Text size and weight: Select the size and thickness of your Display text.
- Colour: change the text, background and border of your button .
- API integration data: Adds a button that would record the metadata info for reporting.
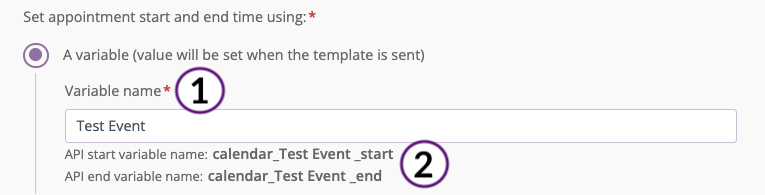
Set Appointment
With the Calendar button, you are given two options for how the appointment date and time will be set on the button. let’s take a look at both options.
-
- Variable Name: Selecting this will give you the option to create an amendable button, which will give you the option to amend the dates of the button before sending for more flexibility.
-
-
- Enter the name of your variable, which will appear as part of the API.
- These are the API variables that will be available to you for entry into the CSV.
-
-
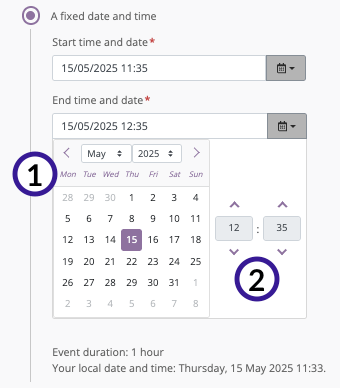
- Fixed date and time: Create a set date and time for your event. This will not be amendable except from the template and will be fixed to this date on your RCS message. When the button is selected by the user, it will give them an option to add to their calendar.
-
-
- Date: Set the start and end date from the calendar
- Time: Set the start and end time of your event (24-hour clock)
-
-
- Now that you have set the appointment as a variable, you will need to update your CSV files you use for uploads with columns that will cover start date and time and end date and time.
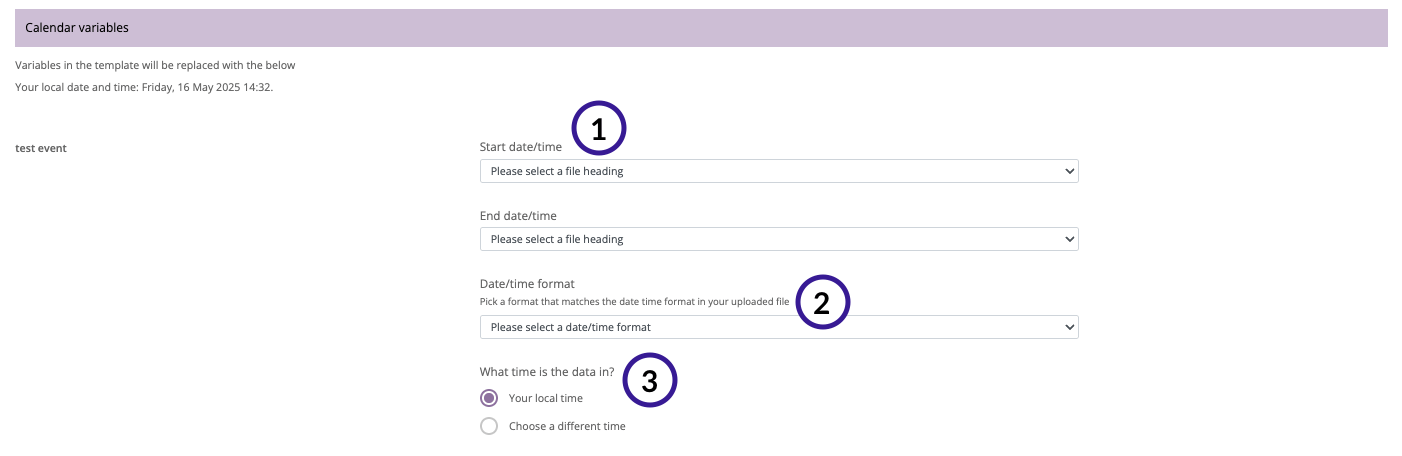
- Date/time: Here, you will select the columns in your CSV file that have this information
- Format: Select from the drop-down which date and time format your CSV columns follow.
- Time zone: this is your time zone. If the event is in. different time zone, you will have the option to select another.
Location
This Location button when selected will give you a notification to open your devices map to show you the location.
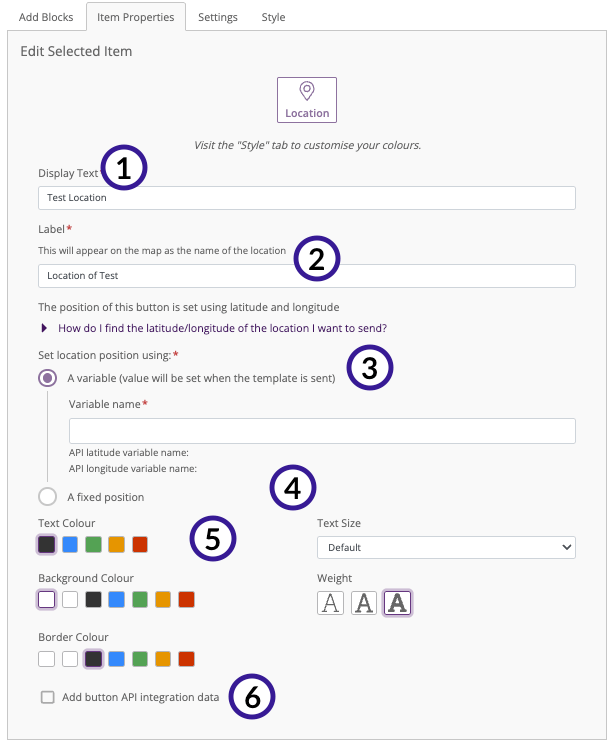
- Display text: This is the text that will appear on your button.
- Label: The location name that will appear on your map.
- Positioning: Set the coordinates for your location so they will show on the recipient’s maps on their device. You have two option:s Variable and Fixed.
- Colour: change the text, background and border of your button. (The coloured text and background will only show in the SMS fallback in the landing page, not on the RCS messages).
- Text size and weight: Select the size and thickness of your Display text (The text sizes will only show in the SMS fallback in the landing page, not on the RCS message).
- API integration data: Adds a button that would record the metadata info for reporting?
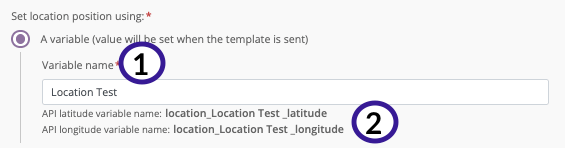
Positioning
With the Location button, you are given two options for how to set the coordinates for your location. Let’s take a look at both options.
-
- Variable name: Selecting this will give you the option to create an amendable button, which will give you the option to amend the Location when selecting the button before sending, for more flexibility.
-
-
-
- Enter the name of your variable, which will appear as part of the API.
- These are the API variables that will be available to you for entry into the CSV.
-
-
-
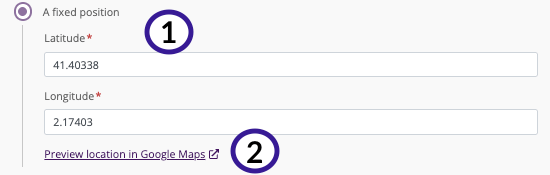
- Fixed position: Manually set the coordinates of your location here; you will need to use Decimal degrees, e.g. 41.40338, 2.17403. When the button is selected, it will give you the option to open the map to the coordinates that are set.
-
-
-
- Longitude/Latitude: Set the coordinates for your location (these need to be Decimal Degrees).
- Preview: You can preview the coordinates on Google Maps here before confirming.
-
-
-
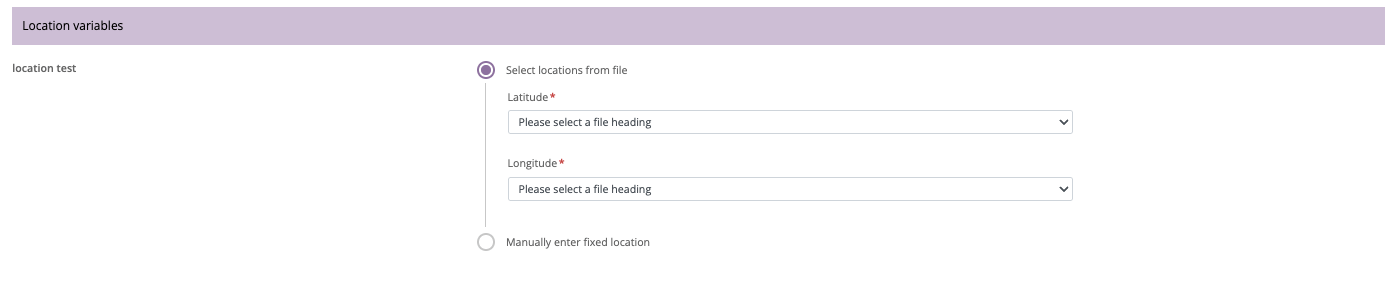
- Now that you have set the appointment as a variable, you will need to update your CSV files you use for uploads with columns that will cover Longitude and Latitude.
-
- Once you have added the columns for Longitude and Latitude to your CSV file, you will be able to select them here from the dropdown.
Preview
Once you are happy to proceed with your RCS message, you will get a final preview to view how your message will look in RCS, SMS and WhatsApp. Press the corresponding button to see the preview.
Please be aware: you will be able to preview your message at any point during its creation process.
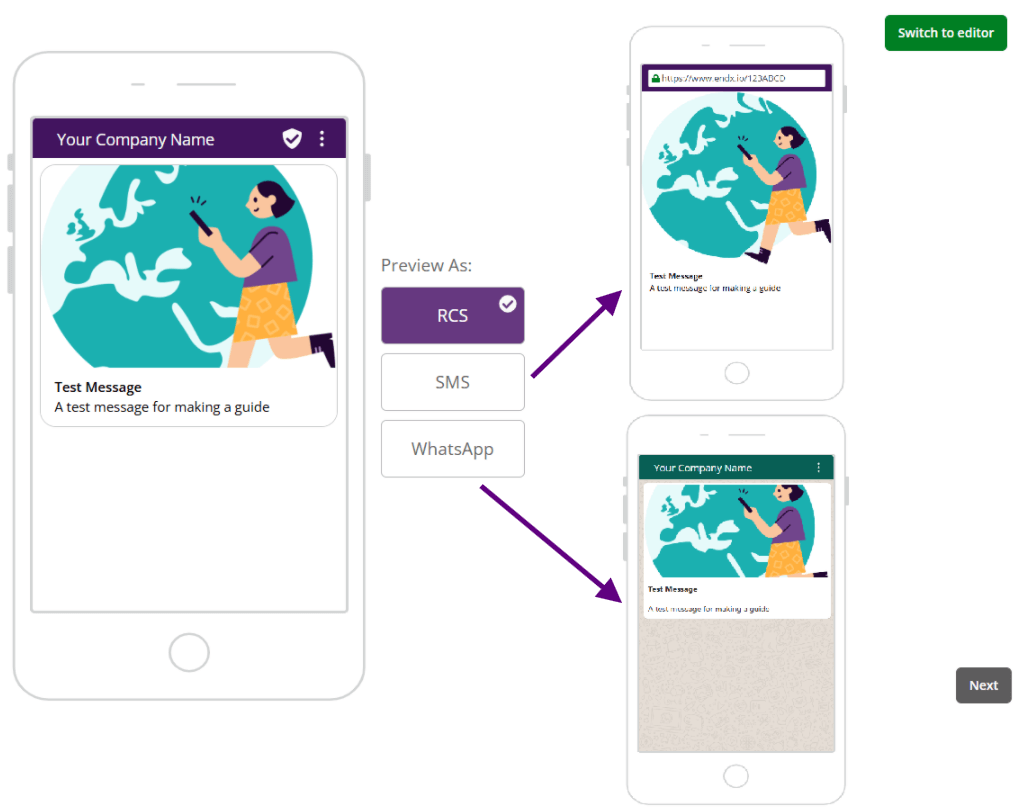
Take a moment to preview your template and make sure it looks just right, then press Next.
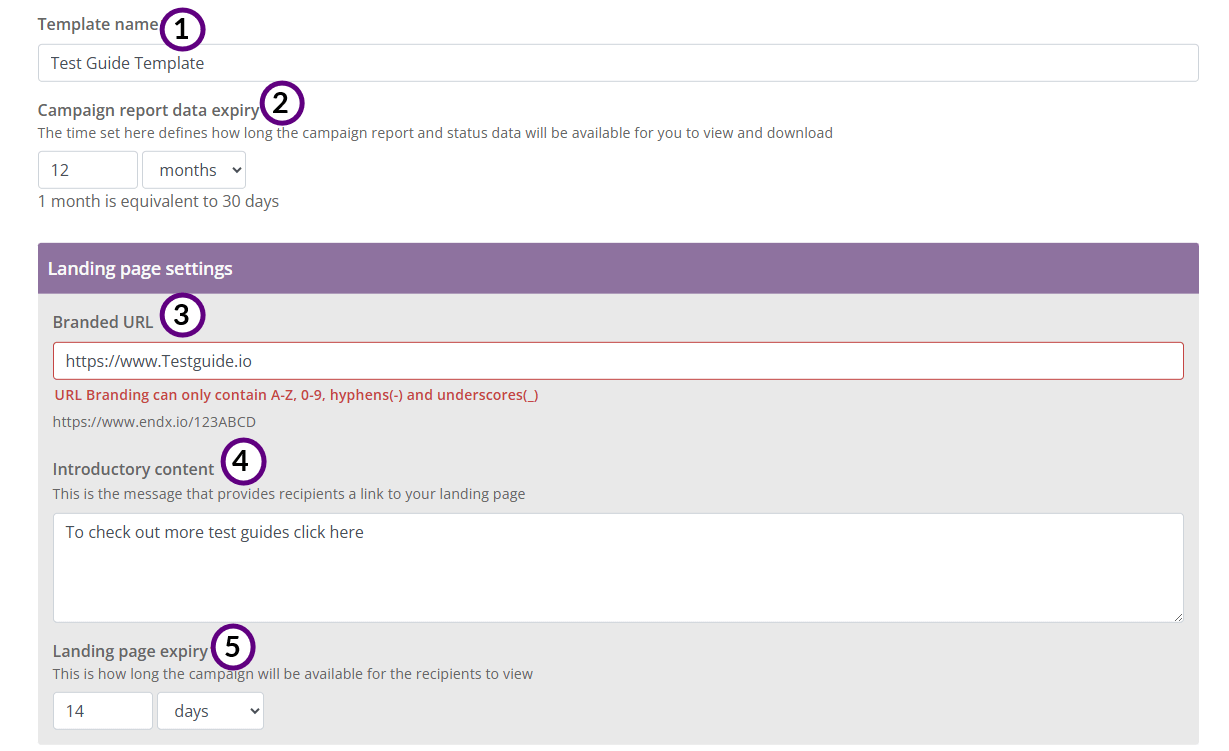
Settings
You will now be on the settings page for your message. Here you will be able to set the settings around how the message will be sent. Let’s take a look at the Layout.
Landing Page settings
-
- Template Name: Give your template a clear and descriptive name.
- Data Expiry: Choose how long you want your campaign data to be available in your reports.
- Branded URL: Allows the customer to change the URLS that are included in their business name (check to confirm)
- Introductory content: This is the message that provides recipients a link to you landing page
- Landing page expiry: Here, you can set how long a campaign will be available to the recipient for them to view.
Please be aware: Steps 3 through 5 are only applicable when an RCS message falls back to SMS.
SMS Settings
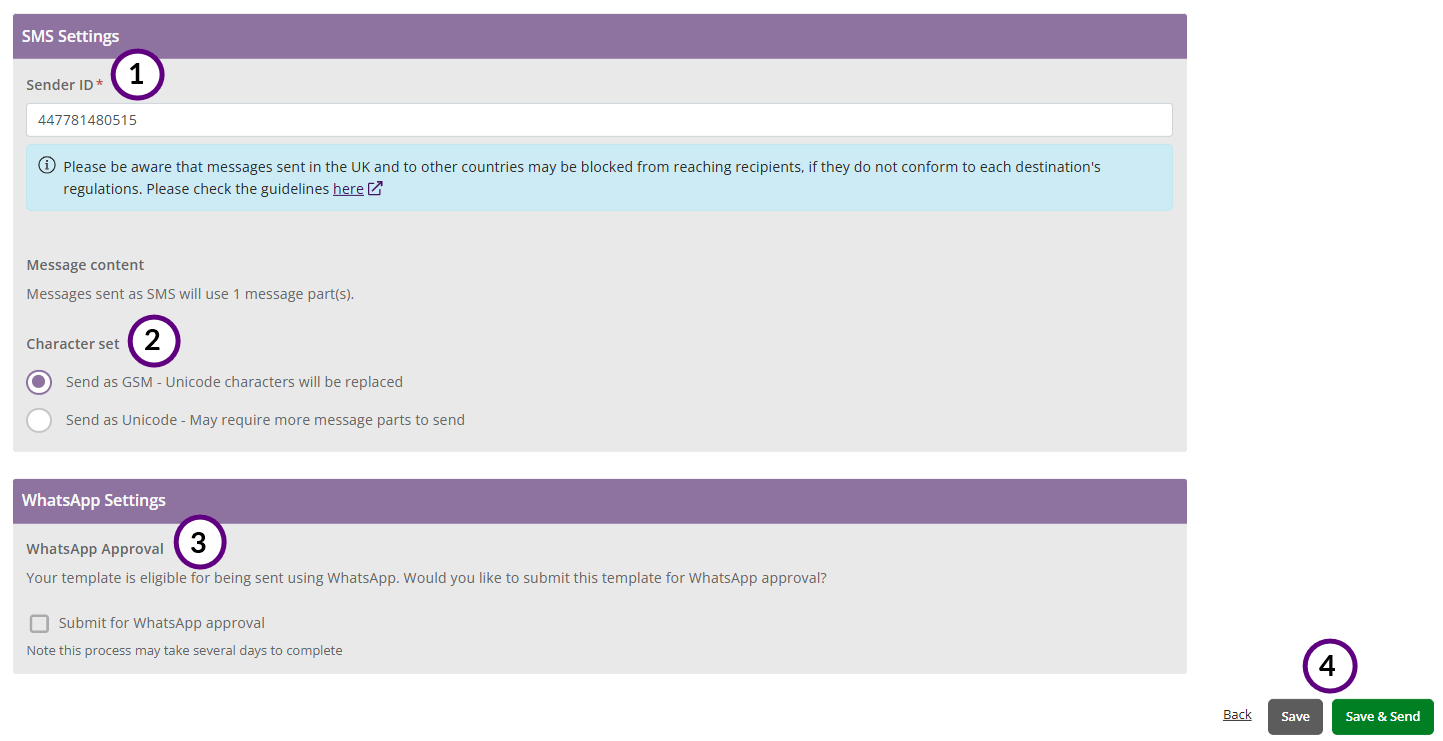
- Sender ID: Enter the number you want the recipient to see when they receive the message.
- Message content: how many parts the message will contain (can have up to X parts)
- Character set: You will have two options for your character set.
- Unicode: Assigns a unique code point to every character, enabling consistent representation of text from different languages and scripts across various platforms.
- GSM: characters that are part of the standard character set for encoding SMS messages, known as the GSM 7-bit alphabet. It includes letters, numbers, and common punctuation, allowing for efficient text message transmission over GSM network.
- Save send: You will have three options here.
- Back: return to the editing page.
- Save: save your template for later use (this will take you to the templates homepage)
- Save and send: Send your message right away.
Schedule: Schedule your message to be sent at a specific time.(We’ll cover sending campaigns in detail in the next section.)
Congratulations! you have created your first template.